
Tongue and Groove Ceiling: Ideas and How to Install
Everything you need to know about tongue and groove ceilings: how they differ from shiplap and beadboard, materials and profiles, 15 ideas, rough UK costs, the fire safety rules many guides miss, and a step by step installation guide.
By Magda Callery, interior designer and florist
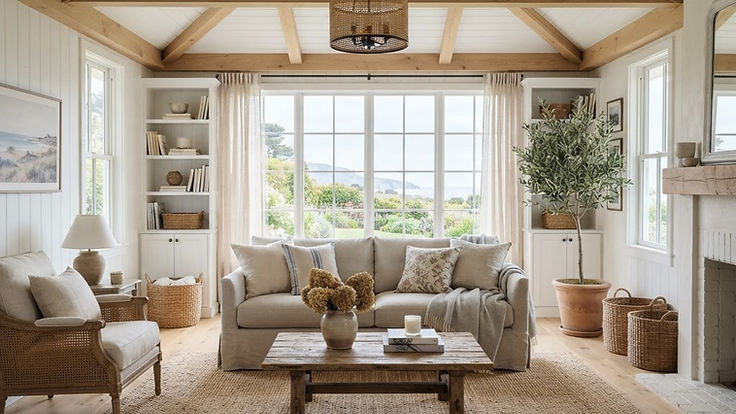
A tongue and groove ceiling is one of the simplest ways to give a room real character. Timber boards overhead add warmth, texture and a sense of craft that plaster can't match, whether you want a bright, white painted coastal look, a cosy cabin feel in natural pine or a moody painted ceiling in a deep colour. It can also cover a cracked or uneven ceiling without the mess of replastering.
In this guide I'll explain what a tongue and groove ceiling is, how it differs from shiplap and beadboard, which materials and profiles to choose, 15 ideas for different rooms, what it costs, the UK fire safety rules many guides leave out, and a step by step guide to installing one.
What Is a Tongue and Groove Ceiling?
A tongue and groove ceiling is made from boards that have a protruding tongue along one edge and a matching groove along the other, so each board slots tightly into the next. The boards are usually fixed to the ceiling joists or to battens, with the nails hidden in the tongue of each board, so the finished ceiling shows no visible fixings.
The joint lets the boards move slightly with changes in temperature and humidity without opening up gaps, which is why tongue and groove has been used for ceilings, walls and floors for centuries, from Scandinavian cabins and American porches to Victorian sculleries and boathouses.
| Question | Quick answer |
|---|---|
| What is it? | Interlocking timber or composite boards fixed to the ceiling |
| Common materials | Pine, spruce, cedar, oak, MDF and PVC |
| Typical board width | Around 70 to 140mm, depending on the profile |
| Looks | Coastal, rustic, Scandi, cabin, cottage, period or modern |
| Can you DIY it? | Yes, with careful planning, a helper and the right tools |
| UK watch out | Untreated timber may not meet fire rules in some rooms and spaces |
Tongue and Groove vs Shiplap vs Beadboard
| Type | How it joins | The look |
|---|---|---|
| Tongue and groove | A tongue slots into a groove on the next board | Tight joints, often with a small V-groove between boards |
| Shiplap | Boards overlap with a rebated (stepped) edge | Visible shadow gap between boards, more rustic |
| Beadboard | Usually tongue and groove with a decorative rounded bead | Traditional, cottage and period |
| Matchboarding | A British term for tongue and groove boarding, often V-jointed | Classic panelling for walls and ceilings |
Many products sold as "shiplap" for interiors are actually tongue and groove boards with a shadow gap profile, so check the joint before you buy, as it affects how you fix the boards.
Choosing the Material
| Material | Pros | Cons | Best for |
|---|---|---|---|
| Pine or spruce (whitewood) | Affordable, easy to work, takes paint and stain well | Knots can bleed through paint; can yellow over time | Most rooms, painted or natural |
| Cedar | Beautiful colour and scent, naturally resistant to decay | More expensive, softer | Porches, garden rooms, saunas, bathrooms |
| Oak and hardwoods | Durable, rich grain, very high end | Expensive and heavy | Statement ceilings and period homes |
| MDF | Cheap, smooth, stable, ideal for painting | Not suitable for damp areas; heavy | Painted ceilings in dry rooms |
| PVC | Waterproof and wipe clean | Less natural look | Bathrooms, wet rooms and utility rooms |
| Pre-finished boards | Painted or lacquered at the factory | Limited colours; touch-ups needed after cutting | Quick installs |
Choosing the Profile
- V-groove: a small chamfer on each edge creates a fine V-shaped line between boards. The most popular look for ceilings.
- Beaded: a rounded bead along one edge, for a traditional, cottage or period feel.
- Shadow gap: a flat, square gap between boards, which reads as more modern and Scandi.
- Flush: almost invisible joints, for a smooth, contemporary timber ceiling.
Wider boards look more relaxed and rustic; narrower boards look more refined and traditional. On a low ceiling, narrow boards running the length of the room help it feel taller and longer.
15 Tongue and Groove Ceiling Ideas
Living rooms and kitchens
1. White painted for a coastal feel. Crisp or warm white boards bounce light around and feel fresh and relaxed, especially with linen, rattan and pale oak. A soft, warm white such as Wimborne White stops the ceiling looking cold.
2. With exposed beams. Combining boards with structural or decorative beams gives a barn or country house look. It's the same layered timber that defines a traditional manor house great hall.
3. A colour drenched ceiling. Paint the boards the same colour as the walls, such as a soft sage, olive or deep green, for a cocooning, contemporary room. The muted olive green shades work especially well on timber.
4. A kitchen ceiling. Boarding a kitchen ceiling adds warmth to a room full of hard surfaces. Use an eggshell or satin finish so it can be wiped clean, and pick up the cabinet colour; white boards above sage green kitchen cabinets look especially fresh.
5. Over a kitchen island. If a whole ceiling feels too much, board a rectangle above the island to define it, with pendants hanging from the boards.
Bedrooms and lofts
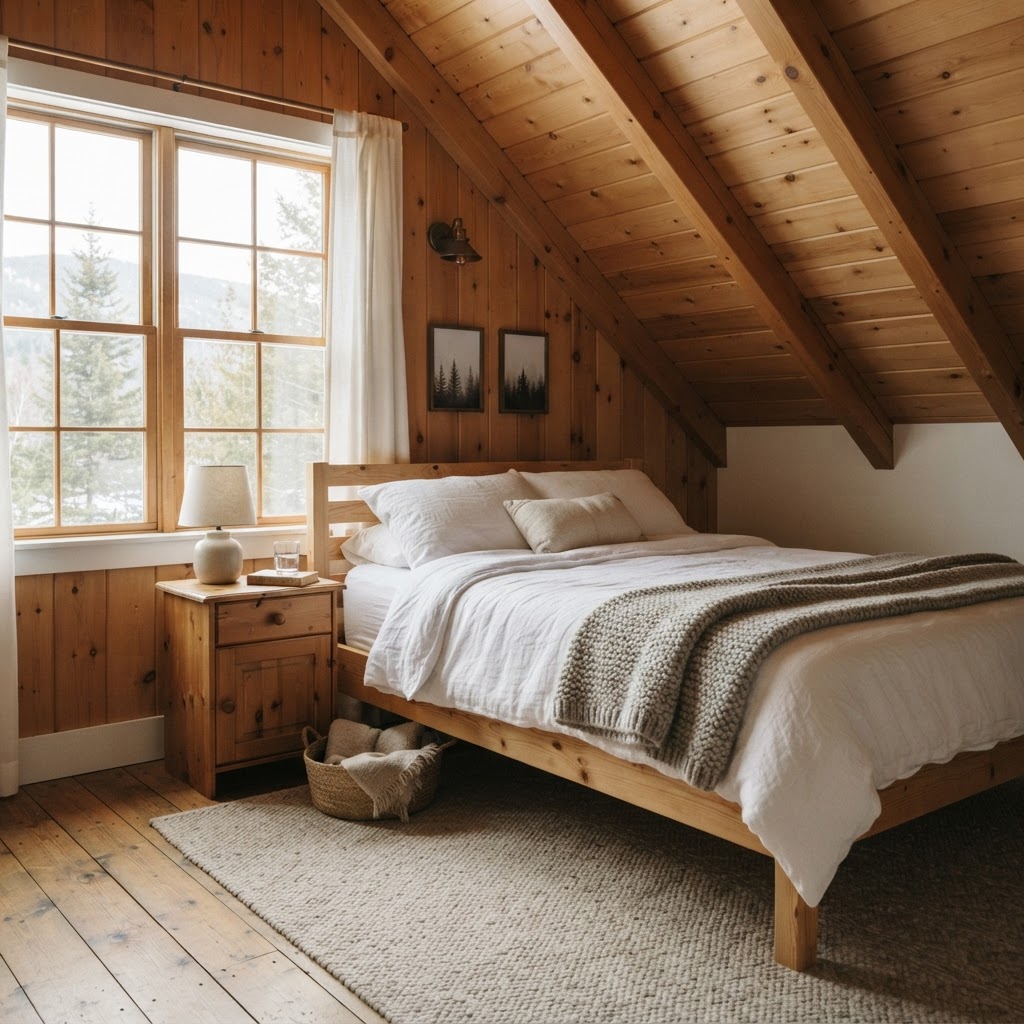
6. Natural pine for a cabin bedroom. Honey-toned pine with white linen and wool throws feels warm, simple and Scandinavian, much like the timber-lined rooms of traditional Japanese house design.
7. Sloped loft ceilings. Boarding a sloping attic ceiling emphasises its shape and makes awkward angles feel intentional and cosy.
8. Limewashed or whitewashed boards. A thinned white finish lets the grain show through for a soft, Nordic look, and paired with beams and limewashed walls it suits a Spanish style bedroom too.
9. A dark painted ceiling. Charcoal, navy or deep green boards above a pale bedroom make a dramatic, cocooning space.
Bathrooms and utility rooms
10. PVC or treated boards in bathrooms. Use moisture-resistant boards and good extraction, and keep timber away from direct shower spray.
11. Beadboard with a period bathroom. Beaded boards suit a roll top bath and traditional fittings.
Outdoor and garden rooms
12. Porch and veranda ceilings. Painted boards are a classic on porches, especially in pale blue, a long American tradition, and they pair well with matching deck railings on a covered veranda.
13. Garden rooms and summer houses. Cedar or treated pine boards suit timber garden buildings and feel connected to the garden.
Clever solutions
14. Cover a cracked or uneven ceiling. Tongue and groove can be fixed over an existing ceiling into the joists, avoiding the dust and cost of replastering.
15. Add character to a new build. Boarding one room's ceiling, such as a snug or a home office, gives a new home instant warmth and texture.
How Much Does a Tongue and Groove Ceiling Cost?
Prices vary widely with the material, the board size, the region and how complicated the ceiling is, so treat these as rough 2026 guide figures and always get quotes.
| Item | Rough UK cost | Notes |
|---|---|---|
| MDF boards | Around £10 to £20 per m² | Paint-grade, dry rooms only |
| Pine or spruce boards | Around £15 to £35 per m² | Depends on grade, thickness and profile |
| PVC ceiling panels | Around £15 to £35 per m² | For bathrooms and utility rooms |
| Cedar boards | Around £40 to £80+ per m² | Premium look and natural durability |
| Battens, fixings and trim | Around £3 to £8 per m² | More if the ceiling needs levelling |
| Carpenter labour | Around £200 to £350 per day | A typical room often takes one to three days |
| Fire retardant treatment | Extra cost per m² | Where building regulations require it |
For an average 4m x 4m room, a DIY pine ceiling might cost a few hundred pounds in materials, while a professionally fitted, painted ceiling is more likely to run to four figures once labour, finishing and electrical work for lights are included.
UK Fire Safety and Building Regulations
This is the part most tongue and groove guides, which are often written for American readers, leave out. In England, Approved Document B sets minimum fire performance standards for wall and ceiling linings, depending on the room and how it's used. Escape routes such as hallways, stairs and landings, and most larger rooms, need linings that resist the spread of flame better than smaller rooms do.
Untreated solid softwood lining boards around 12mm or thicker generally achieve Euroclass D-s2,d0, according to Logie Timber. That's acceptable in some situations, but it may fall short of what's required for many rooms and circulation spaces. In practice:
- Check with building control before boarding a hallway, landing, stairwell or a whole ceiling in a larger room, particularly in flats.
- Use fire retardant treated boards, or an approved intumescent coating system, where a higher class is needed.
- Keep the plasterboard behind the boards rather than removing it, as it plays a part in fire protection, especially between floors.
- Use fire-rated downlights where you cut into a ceiling that separates floors, and have new lighting circuits installed by a registered electrician.
- Scotland, Wales and Northern Ireland have their own building standards, so check your local rules.
A note on textured ceilings
If you're boarding over an old textured ceiling, such as Artex, have it tested before you drill or sand it. Textured coatings applied before 2000 may contain asbestos, and the Health and Safety Executive advises against disturbing material that could contain it until you know.
How to Install a Tongue and Groove Ceiling
Tools and materials
- Tongue and groove boards, plus about 10% extra for cuts and waste
- 25 x 50mm treated battens, if fixing across joists or levelling the ceiling
- A stud and joist finder, spirit level and chalk line
- A mitre saw, jigsaw (for cut-outs) and a table or circular saw for ripping the last board
- A brad nailer or hammer and lost head nails, or concealed fixing clips
- Wood glue, knot sealer, primer and paint, or a clear finish
- Scotia, quadrant or trim for the edges
- Safety glasses, a dust mask and a sturdy platform or tower
Step 1: Let the boards acclimatise
Stack the boards in the room for 48 to 72 hours, with spacers between them, so they adjust to the room's temperature and humidity. Timber that's fitted straight from a cold store can shrink and open up gaps later.
Step 2: Prepare and finish the boards first
It's far easier to prime, paint or seal boards on trestles than overhead. Seal knots in pine with a knot sealer so resin doesn't bleed through paint, and apply the first coats before fitting. Painting the tongues stops bare stripes appearing if the boards shrink.
Step 3: Find the joists and plan the direction
Boards must be fixed into solid timber, never only into plasterboard. Mark the joists with a chalk line. Boards usually run at right angles to the joists so you can fix into every joist. If you want the boards to run the other way, fix battens across the joists at 400 to 600mm centres first. Running boards along the length of the room makes it feel longer; across a narrow room, wider.
Step 4: Plan the first and last board
Measure the width of the ceiling and divide by the visible width of a board. If the last board would be a thin sliver, trim the first board instead so the boards at each side are a similar width.
Step 5: Fix the first board
Snap a straight line along the starting wall, as walls are rarely straight. Place the first board with the groove facing the wall, leaving a 5 to 10mm expansion gap, and face fix it close to the wall edge where the trim will hide the nails.
Step 6: Secret nail the rest
Slot each new board's groove onto the previous tongue, tap it home with an offcut (never directly on the tongue), and fix it by nailing through the tongue at about 45 degrees into each joist or batten. The next board hides the nail. Concealed fixing clips are an alternative.
Step 7: Stagger the joints
Where boards meet end to end, make the joint over a joist or batten and stagger joints across the ceiling so they don't line up.
Step 8: Cut around lights and hatches
Mark light positions before you fit each board, and cut neat holes with a hole saw or jigsaw. For a loft hatch, frame the opening and finish it with matching trim.
Step 9: Fit the last board and trim
Rip the last board to width, leaving the same 5 to 10mm gap, and face fix it near the wall. Finish all edges with scotia, quadrant or a slim trim to cover the expansion gaps.
Step 10: Finish
Fill nail holes if you're painting, apply the final coats and touch up cut ends. For a natural look, a clear matt varnish or hardwax oil protects the timber without the yellowing of some older lacquers.
Pros and Cons
| Pros | Cons |
|---|---|
| Adds warmth, texture and character | Costs more than a plastered ceiling |
| Hides cracks and uneven ceilings | Fire rules may require treated boards in some rooms |
| Hidden fixings and a clean finish | Timber moves with humidity |
| Works in many styles, painted or natural | Can make a low, dark room feel heavier if poorly chosen |
| DIY friendly for confident beginners | Working overhead is tiring and needs a helper |
Frequently Asked Questions
What is a tongue and groove ceiling?
A ceiling made of interlocking boards, each with a tongue on one edge and a groove on the other, fixed to the joists or battens with hidden nails.
Which direction should tongue and groove run on a ceiling?
Usually at right angles to the joists, so you can fix into each one. To run them the other way, fit battens across the joists first.
Can you put tongue and groove over an existing ceiling?
Yes. Fix the boards through the plasterboard into the joists or into battens fixed to the joists, not into plasterboard alone.
Should you paint tongue and groove before or after installing?
Prime and apply the first coats before installing, including the tongues, then fill nail holes and apply a final coat once the ceiling is up.
Is a tongue and groove ceiling outdated?
No. White painted, colour drenched and natural timber ceilings are popular in coastal, Scandi, Japandi and country interiors, and they suit both period homes and new builds.
Can you use tongue and groove in a bathroom?
Yes, if you choose moisture-resistant boards such as PVC or properly treated and sealed timber, and the room has good extraction.
Does a tongue and groove ceiling need an expansion gap?
Yes. Leave about 5 to 10mm around the edges and cover it with trim, so the boards can move without buckling.
Do I need building regulations approval for a tongue and groove ceiling?
Boarding a ceiling isn't usually notifiable on its own, but the materials still have to meet fire safety rules for that room. Check with your local building control, especially for hallways, landings and flats.
A Ceiling Worth Looking Up At
A tongue and groove ceiling adds warmth, texture and craftsmanship to almost any room. Choose the right material for the space, finish the boards before they go up, fix them into solid timber and, in the UK, check the fire rules before you start.
For more home renovation inspiration, explore the interior design section, and if you'd like help deciding on finishes and colours for your own ceiling, you can book a one-hour online interior design consultation with me.
About the author
Magda Callery is a UK interior designer and florist with more than 15 years' experience designing homes, pubs, restaurants and bars, and her expert commentary has featured in Homes & Gardens, The Mirror and The Spruce. Explore more of the interior design articles.
Continue reading

Sage Green Kitchen Cabinets: Paint Colours and Ideas
A designer's guide to sage green kitchen cabinets: the best sage paint colours, what worktops, handles, walls and floors to pair them with, 10 kitchen ideas, how to paint your cabinets properly, rough costs and mistakes to avoid.


Sofa Table Behind Couch: Sizes, Styling and Ideas
How to choose a sofa table to go behind your couch: the right height, length and depth, how much space you need, which style suits your room, 20 ideas for lamps, storage, desks and open plan layouts, and the mistakes to avoid.

What Is a Manor House? History, Features and Style
What is a manor house? A UK interior designer explains the history of the manor house, its key features, how it differs from castles, country houses and stately homes, famous examples to visit, lordship titles today and how to get the manor house look at home.